
You've no doubt seen these before in a documentary: an interviewee sitting just inches in front of a bookcase, with the individual book titles visible and distracting; a house plant invading the frame; an incandescent desk lamp in the background whispering for attention while the interviewee's eye-line is awkwardly off to the side. Or perhaps you've seen this one: the interviewee engulfed by a high-back sofa, an exposed lav mic stealing our attention, while the hum of a house appliance and the jingle of a busy necklace cause us to squint trying to decipher the subject's words. These are the clichés and blunders of recording documentary interviews.
As someone who has watched even more interviews than I've shot, I've developed a discerning eye for the exemplary—and for the cringe-worthy. What I aim to provide here beyond dos and don'ts is a primer for rendering clean, cinematic interviews that allow the viewer to focus on what matters: emotion and storytelling.
The key to shooting documentary interviews is eliminating distracting sights and sounds; these take us out of the story. Second, if you must choose between a visually pleasing interview set-up and a good-sounding one, always chose good sound. The audience will forgive a flawed shot, but will tune out if it can't hear the dialogue.
Selecting the Interview Space
Always shoot indoors, where sound and light can be controlled. Shooting outdoors has many hazards. Shifting sun means constant adjustment of camera exposure. Bright light in your subject's face will cause squinting. Worse, placing the sun behind your subject will result in harsh backlighting. Likewise, even in suburbia, a symphony of helicopters, car horns, sirens, wind, barking, leaf blowers and construction will render otherwise beautiful footage unusable.
Shooting indoors has its challenges too. To mitigate these, choose a space where noise-generating devices such as humming fridges, buzzing lights, A/C units and wobbly ceiling fans can easily be switched off. Set a phone notification to turn these back on when finished—especially the fridge!
Next, turn off ceiling lights, as these will create a flat, un-cinematic look. If these lights can't be turned off, remove the bulbs.
Since natural light changes with time and sound travels easily through glass, choose a space without windows. Otherwise, close blinds to block light. If that fails, wait until dark, or cover windows with trash bags, black foil or Duvetyne. To dampen unwanted sounds, cover windows with sound blankets (Matthews brand makes the best-selling sound blanket and has grommets for hanging).
Lastly, pick a carpeted room. This will prevent reverb (echo) and produce better sound recordings. Otherwise, move area rugs from adjacent rooms into the interview room or place sound blankets on the floor underneath your subject's feet.
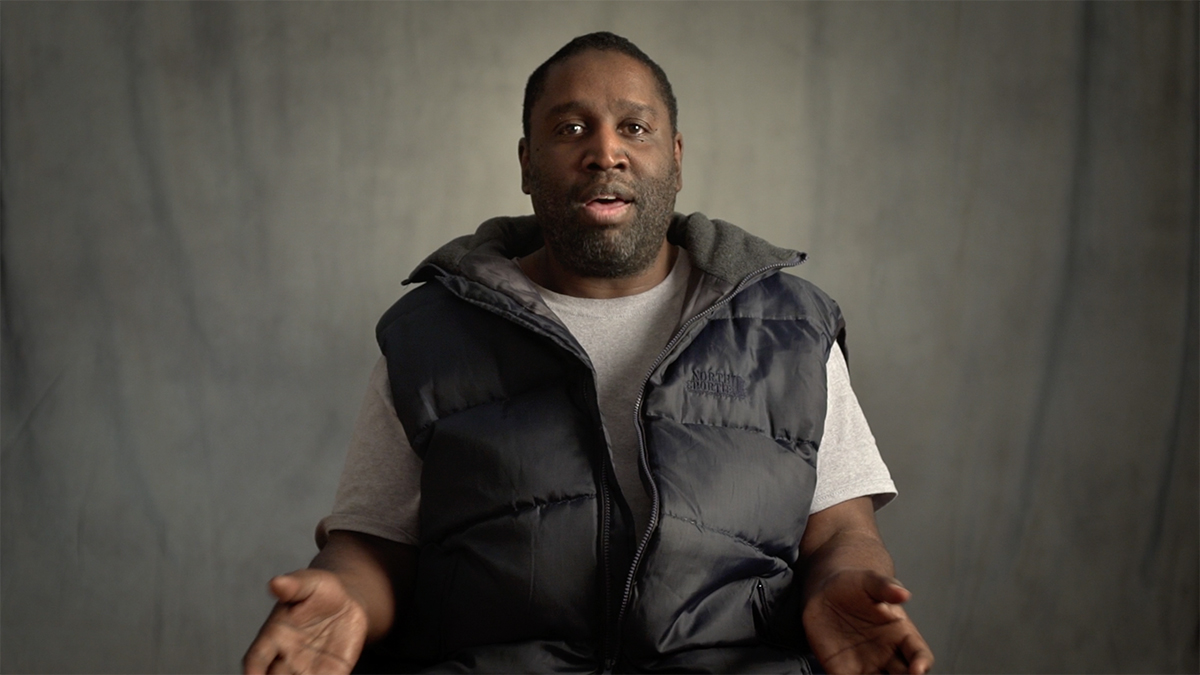
It may seem trivial, but selecting the right chair is important too. The best seat for your subject should not swivel, roll or creak, so avoid wheeled or wooden chairs, especially when interviewing fidgety children; they love to swivel. Next, avoid high-back chairs, since they'll distract the viewer by appearing in the frame directly behind the subject's head. For this reason, and because your subject will likely sink over time, sofas are a poor choice too. Place the subject and interviewer at the same height to match their eye-lines by using at least one height-adjustable chair. Otherwise, use pillows underneath the subject or interviewer to even out their heights.
Preparing Your Subject
Prepping your subject for the interview begins well before the shoot. Instruct your subject not to wear logos, busy patterns or bright colors, since these will draw attention away from his/her face. Parallel thin stripes grouped closely together create distracting patterns on high-definition cameras, so avoid those too. If possible, email your subject his/her appearance release to read in advance of the shoot, since presenting the release right before recording may throw your subject off with legal concerns you may not be able to address. Check your subject for loose bracelets, necklaces or noisy fabric that may produce unwanted sounds during the interview; remove them, if possible. Apply a little makeup powder to the face to reduce oily shine, but be sure to cover the shoulders and chest with a paper towel first, since powder may fall on your subject's dark-colored clothing, creating the impression of dandruff. Bring at least two shades of powder to accommodate a range of skin tones. Once the subject is prepared for camera, ask crew members to silence their phones and record at least 20 seconds of room tone. Room tone is the natural sound a room produces from the combination of air ducts, generators, buzzing lights and the like. Editors use this room tone to fill in gaps between cut-up sound bites. This helps smooth out the harsh transition from speech to silence. Since room tone can change over time, record another 20 seconds of tone right after the interview concludes.
Subject-Background Separation
Separating your subject from the background is the main objective when framing and lighting an interview. Directing the viewer to the subject's face, rather than a distracting background, helps us connect emotionally with the subject. To achieve this separation, select a room with enough depth to bring your subject at least 10 feet away from the background. Larger rooms also allow heat from studio lights to dissipate, keeping you and your subject cool. Next, pair a large sensor camera (super 35mm or full frame) with a lens capable of a maximum aperture of f/2.8 or faster. This camera/lens combination produces a shallow depth of field where the subject is sharply in focus while the background is nicely blurred. Shoot with the aperture between f/2.4 and f/4. Opening the iris wider than f/2.4 will create an even shallower depth of field, but at the risk of the subject going out of focus with even a slight lean in or away from the camera.
Conversely, closing the iris higher than f/4 will ensure your subject stays in focus, but at the expense of the background also being in focus—canceling our subject/background separation. Aim for a focal length between 40mm and 135mm; anything wider than 40mm will begin to produce a rounded, unflattering image that exaggerates the nose and other facial features. On the other hand, lenses longer than 135mm will require the camera (and interviewer) to be too far from the subject to maintain an intimate connection.
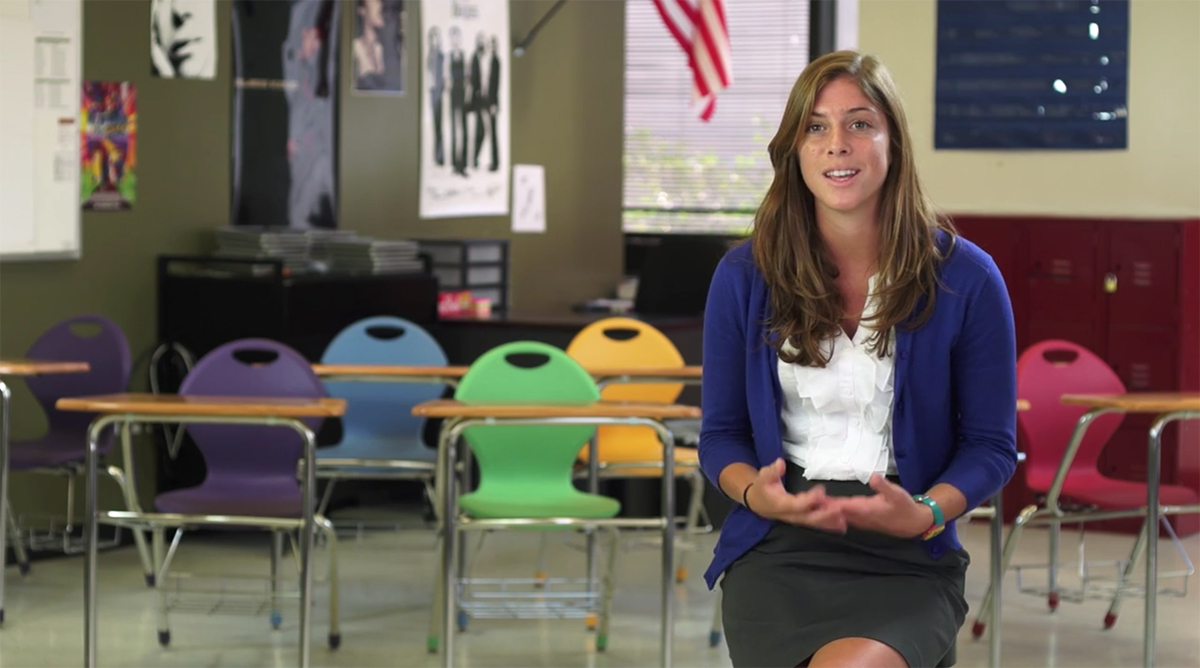
To further separate subject from background, bathe the subject with at least three times as much light as the background. Avoid having busy or colorful objects in the background, since they will compete for attention with your subject's face. Keep clocks, computer monitors and pets out of the frame, since they will change with time, creating awkward continuity in editing. Finally, avoid the unholy trinity of documentary interview backgrounds: bookshelves, plants and desk lamps. They've been done to death. Try something new. Corners, for example, make more dynamic backgrounds than flat walls.
Rule of Thirds
The rule of thirds dictates the composition of a good image. It states that people and objects should be placed in the upper or lower third and on the left or right third of the frame. Amateur photographers make the mistake of placing their subjects in the center of the frame because "it looks right." When a composition is too symmetrical, we see it, like it, get bored and look elsewhere. But with a composition that's slightly "off," following the rule of thirds, our eyes get a little frustrated and intrigued. Applied to documentary interviews, this rule conveniently leaves two-thirds of the frame ("negative space") open for title text to identify the subject. This is another reason to keep your backgrounds clean: Text may end up there, and it has to be legible.
Film your subject somewhere between waist-up and chest-up, leaving just a pinch of room above the head. Going wider than a waist-up composition will leave your subject's face relatively small in the frame, making it harder to connect emotionally. Conversely, having the subject's face take up the entire frame can feel overwhelming, especially viewed in a movie theater (Attack of the 80-Foot Face!).
Lighting
The classic interview light set-up is also based on the number three. It's called three-point lighting. While this arrangement has been standard for years, I think it's overkill for most documentaries. You only need a key light as long as it's bright and soft. Using a backlight creates a dated, artificial "studio" look you might see on 60 Minutes or '90s factual television. Moreover, backlights are unflattering on balding or thin-haired subjects. The fill light is not necessary unless having a fairly even light on both sides of the face is essential. Doc interviews look much more cinematic when only one side of the subject's face is fully lit. Remember that adding a back light and fill light means more time to pack, unpack, carry, set up and break down your gear. Since not all of us have the budget to hire a crew every time, we often operate as one-man bands, relying on quick interview setups. The quickest is a single key light—ideally a bright one (at least 500 watts or LED/CFL equivalent) with a large surface-area softbox to diffuse and soften the light. I use the Lowel Rifa EX88, which is lightweight, bright (1000 watts) and inexpensive, and has the softbox built into the light so the box doesn't have to be assembled and dissembled every time like a typical chimera. I always bring a spare bulb or two in case my first one burns out, plus a 20-foot extension cord in case the light's own cable isn't long enough to reach the nearest outlet.
Position your key light a couple feet higher than your subject's head and tilt the light down towards the subject's face. This angle will prevent shadows from appearing in the frame behind your subject. We use a softbox to diffuse the light create the "cinematic look." This look hinges on the gentle ("soft") transition from light to dark on the subject's face. To achieve this look, position the light to the side of your subject's face at around a 45-degree angle. Positioning the key light towards the center of the face will yield even light on each side of the face—which looks perfectly pleasant, but has no "edge" and therefore will produce a flat, non-dramatic look in your interviews, similar to using a fill light.
Recording Audio
If you have enough time to set up a shotgun ("boom") microphone on a stand, you'll get much better sound than with a lavalier microphone. Since lav mics are omnidirectional, they pick up sound evenly from all directions. Unfortunately, this includes unwanted sounds such as vehicular traffic, air conditioners and footsteps. Shotgun mics, on the other hand, are unidirectional. So if you aim a shotgun mic at your subject's mouth, the mic will only record sound coming from that direction and reject most off-axis sound.
Secondly, since lav mics are attached to the subject, any accidental rubbing of the mic onto jewelry, hair or the subject's hands will produce scratchy audio. Because the shotgun mic is suspended from a boom pole above the subject, there's no chance of anything rubbing against it. Position the microphone at a 45-degree angle aimed a bit below your subject's mouth, since some of the sound is actually coming from the vocal cords in the neck, rather than directly from the mouth. If you must use a lav mic, be sure to conceal it. There's no excuse for not taking two minutes to tape the mic under your subject's clothing using tape or a professional adhesive material. The best adhesives are cut-up pieces of Dr. Scholl's moleskin (available at drug stores) and Rycote stickies (available from production equipment stores). The Sanken COS-11D and Tram TR50 are the best and most popular lav mics in the doc world. For shotgun mics, the Sennheiser MKH 416 has been the industry standard for years—for good reason—while the Røde NTG-1 is among the best value options for budding doc filmmakers.
The documentary interview is often dismissed by the uninitiated as a "talking head." While this pejorative categorization may be a little unfair, if the filmmaker does not take the time to prepare, the end result could indeed produce the clichés of an underachieving documentary. But with a careful consideration of the aural and visual palette, coupled with the right tools and a strong director-subject rapport, the interview can propel the narrative forward and provoke and engage the viewer just as much as well-shot verité. It's all about recording clean, cinematic sight and sound.
Adam Irving is a documentary cinematographer, director and distribution consultant known for Off the Rails (AMC Networks, 2016). Rails was a New York Times Critics' Pick and a Critics' Choice Award nominee, and was selected as one of the top ten documentaries of 2016 by over a dozen publications after it won top honors at nine festivals. Adam holds a BA from Brandeis University and an MA from NYU's Tisch School of the Arts.
